Last year, while I was working on a horn-extender for my G&L ASAT bass (http://k6jca.blogspot.com/2013/06/homebrew-horn-strap-button-extender-for.html ), the bass accidentally fell and the paint chipped:
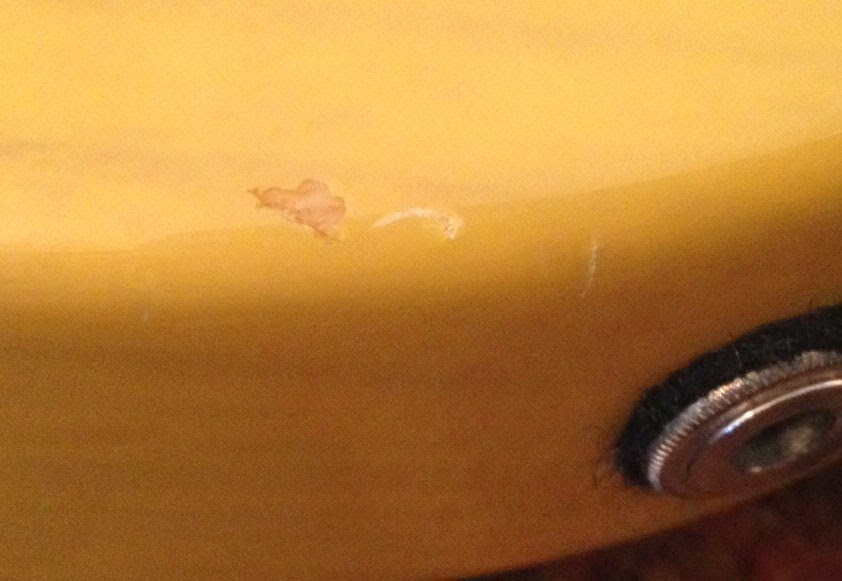
Nobody that I contacted, including G&L, would take on the repair job. They wouldn't even quote it.
So it looked as though I was on my own. My first attempts went nowhere:
I tried to tint cyanoacrylate glue (superglue) with "vintage amber" liquid stain from StewMac. But they were impossible to mix, as the superglue immediately hardened when the vintage amber finish was added to it.
Attempts tinting cyanoacrylate glue with other materials also failed. And the damaged area was getting larger, as I cleaned off the material from each of these experiments. Not good!

Time for a different tack. What if I used Testors Enamel Model Paint -- the same sort of paint I'd used as a kid to paint model cars and planes?
I found a local hobby store and picked up some 1/4 oz bottles of the following colors:
- Flat Yellow (Testors 1169)
- Glossy Brown (Testors 1140)
- Glossy White (Testors 1145)
I was able to mix these and get a pretty close match to the butterscotch color. Then I added enamel Thinner (Testors 1148) to thin it out. You can see the four bottles of Testors Enamel below.

With a fine brush I was able to add the paint to the surface of the body But the paint was still fairly opaque, and it blocked the grain lines of the wood below. To compensate, I mixed in a very small dab of the brown to into my mixture to darken it slightly, and then I applied it with a very narrow brush to simulate the grain lines. (The mixture in the corked vial in the photo above is the slightly darkened color I used to recreate the grain lines).
(By the way, I wasn't painting on the body wood itself, but on something that felt plastic -- probably a poly sealer coat).
When I finished, I could tell that it wasn't perfect, but it wasn't bad, either.
I gave the enamel about a week to dry, following which I sanded it smooth with 2000 grit sandpaper and a very light touch.
Then I started to build up layers of clear-coat on top of it, using Spraymax 2K Glamour High Gloss Clear Coat. This is a 2-component clear coat in a spray can that, after mixed, only has a pot life of 48 hours. I sprayed about 8 thin coats, then waited 24 hours. Lightly scuffed the previous day's clear coat with 600 grit sandpaper (dry) and then sprayed again, adding 8 more layers. Repeated the wait one more time, then scuffed and painted one more time. The can was then finished, even though there was quite a bit of paint left in it, because I'd reached the 48 hour pot life.
But the clear coat still wasn't high enough (there was a significant dip where I'd removed material during my experiments). It took another can of clear coat before I had built it up high enough.
Here' a picture of the bass masked for painting.

(Important note: the Spraymax 2K is nasty stuff -- wear a quality paint respirator, goggles, nitrile gloves, and cover yourself. Research before you spray!).
I gave the clear coat about a week to cure, then I started sanding it down.
First, 320 grit, dry. (I stuck the sandpaper to a small plastic cube using double-sided sticky tape, both from the local Tap Plastics store).

When I got the height of the clear-coat down to where it was near the body, I then switched to 600 grit (wet), then 1000 grit (wet).
Here's the 600 grit:

When it looked as though it was essentially blended with the body, I began using Micro-mesh Soft Touch Finishing Pads. These run from 1500 to 12,000 grit, and I cut little squares out of each pad to use, rather than try to polish using the entire pad. I used them wet, not dry.
You can see the little squares of the Micro-mesh pads scattered on the table in the picture below.

After finishing with the 12,000 grit, it was time to polish. First, I removed the knobs and masked the body.

Then I polished using "Meguiar's Diamond Cut Compound 2.0". Because of the previous steps using the Micro-mesh pads, this polishing step went quickly. Here's the final result:

And a closeup.

It isn't perfect -- if I look closely I can see a difference between the original color and the new paint. And if I run my finger over the patched area I can feel some slight rippling in the top coat, so I could have done a better job sanding the clear coat level. But it is much better than it was, and I'm satisfied with the result!
Important notes:
Although these results are satisfactory for me, I cannot guarantee that this process will work for you. If you are concerned about ruining your body, I would suggest seeking the help of others.
And there might be a better way to fix a paint chip in butterscotch paint. This is the path I took.
Also, I want to again stress that the Spraymax 2K clearcoat spray paint is a hazardous material and should be used with safety foremost in mind. Wear appropriate protective covering and a quality respirator. Do your research first, then spray!
And the standard caveat applies: attempt at your own risk, I cannot guarantee your results.
(Comments on this topic can also be found here: http://www.talkbass.com/threads/repairing-a-chip-in-a-g-l-butterscotch-blonde-finish.1116146/ )
Links to Bass posts of mine...
Sonic Blue Bass (part 1 of a 3 part series)
Mellow Yellow Bass
Short-scale Telecaster Bass
Bass Guitar Painting Jig
Repairing a G&L Butterscotch Blonde Paint Chip
G&L ASAT Bass Strap-button Extender


No comments:
Post a Comment